
Build a Raspberry Pi Storage Server (NAS)
Create a compact, powerful Network Attached Storage server using Raspberry Pi, SATA HAT, and OpenMediaVault for reliable file sharing across your network.
- Raspberry Pi
- Intermediate
- 3 to 4 hours
- 15 steps
Shop this project
CartYou'll need
- Raspberry Pi 5 (4GB)Sold out · view product
 Raspberry Pi 27W USB-C Power Supply For Raspberry Pi 5Black$14.46
 Micro SD Card Preloaded Raspberry Pi OS (Legacy-32 Bit)16GBSold out · view product
 Cat 5 Ethernet Cable1 Ft$7.99
Prices from vilros.com. Tax and shipping at checkout.
Before you start, you'll need
- Raspberry Pi 5 (4GB or 8GB recommended)
- SATA HAT (Hardware Attached on Top)
- One or more 2.5" SATA hard drives or SSDs
- MicroSD card (32GB or larger) for OS
- USB-C power supply (5V 5A for Pi + HAT)
- Ethernet cable (or 2.5Gbps USB Ethernet adapter for faster speeds)
- Screws and standoffs (usually included with SATA HAT)
Mount the Raspberry Pi to standoffs
About 10 minutes
Securely attach the Pi board using screws and copper standoffs.
- Take the M2.5×5 screws and M2.5×18+6 copper standoffs from the SATA HAT screw kit.
- Insert screws through the four mounting holes on the Raspberry Pi board.
- Thread copper standoffs onto the screws from the underside, tightening until the board is secure but not over-tightened.
You should see
The Raspberry Pi board is firmly mounted with standoffs extending below, ready to attach to the SATA HAT.
It didn't work
Standoffs won't thread onto screws.
Ensure you're using M2.5 screws (not M3). Check threads aren't damaged. Try a different screw or standoff from the kit.
Connect the SATA HAT and FPC cable
About 10 minutes
Attach the SATA HAT to the Pi and connect the FPC data cable.
- Locate the FPC connector on the back of the SATA HAT.
- Carefully insert the IPEX (FPC) cable into the connector. This cable carries data between the Pi and the HAT.
- Align the SATA HAT's GPIO pins with the Pi's 40-pin header, then press down gently until fully seated.
- Secure the HAT to the standoffs you installed earlier.
You should see
The SATA HAT is firmly attached to the Pi with the FPC cable connected.
It didn't work
FPC cable won't insert or connector feels loose.
Lift the connector latch if present, insert cable with contacts facing the right direction, then close latch. Be very gentle—FPC connectors are fragile.
Assemble the hard drives
About 15 minutes
Mount one or more drives onto the acrylic holder board.
- Place the first SATA drive onto the acrylic holder board.
- Use screws to fix the drive into the first two mounting holes. Don't fully tighten yet.
- If using multiple drives, repeat for each drive, spacing them on the holder board.
- Once all drives are positioned, tighten all screws securely.
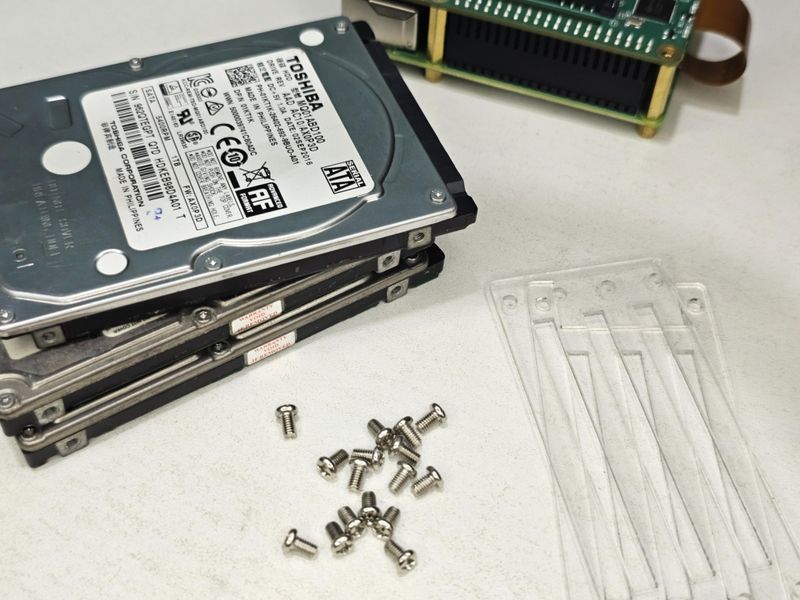
You should see
One or more drives are securely mounted on the holder board, ready to connect to the SATA HAT.
It didn't work
Screw holes don't align with drive mounting points.
Check you're using 2.5" drives (not 3.5"). Reposition the drive so screw holes match the holder board pattern.
Connect drives to the SATA HAT
About 10 minutes
Attach the drive cluster to the SATA HAT via SATA connectors.
- Bring the assembled drive holder close to the SATA HAT.
- Check the orientation of the SATA connectors—they only fit one way.
- Align each drive's SATA connector with the corresponding port on the HAT, then press firmly but gently until fully seated.
- SATA connectors should click or seat fully. Don't force them at the wrong angle.
You should see
All drives are connected to the SATA HAT. Connectors are fully seated and drives are stable.
It didn't work
SATA connector won't seat or feels misaligned.
Check orientation—SATA connectors have an L-shape and only fit one way. Try rotating the drive holder slightly.
Assemble and install the top board
About 15 minutes
Build long standoffs and mount the top board.
- Take M2.5×40+6 copper pillars and connect three together to form four long standoffs.
- Install these long standoffs into the four mounting holes on the SATA HAT.
- Locate the data cable connector on the underside of the top board (usually labeled for fan and display).
- Align the top board over the standoffs and lower it into place.
- Secure the board with screws.
You should see
The top board is mounted above the drive cluster, connected via long standoffs.
It didn't work
Standoffs won't connect together.
Check you're threading male-to-female ends. Clean threads if dirty. Try a different pillar from the kit.
Connect the top board data cable
About 5 minutes
Link the top board to the SATA HAT for fan control and display communication.
- Take the data cable from the top board (usually a ribbon cable or multi-wire connector).
- Carefully plug it into the corresponding connector on the SATA HAT.
- This cable controls the cooling fan speed and top display data (if your HAT has a display).
You should see
The data cable is firmly connected. Fan should spin (if powered) and display should initialize.
It didn't work
Fan doesn't spin or display is blank.
Double-check cable orientation and that it's fully inserted. Some HATs require software configuration for fan control.
Connect Ethernet (or USB Ethernet adapter)
About 5 minutes
Set up network connectivity for NAS access.
- Connect an Ethernet cable from your router/switch to the Pi's built-in Ethernet port for basic 1Gbps speed.
- For faster transfers, consider a 2.5Gbps USB Ethernet adapter plugged into one of the Pi's USB 3.0 ports.
- The built-in port is convenient, but a 2.5Gbps adapter significantly improves performance for large file transfers.
You should see
Ethernet cable is connected. The Pi's network LED (if visible) blinks when connected to a live network.
Install Raspberry Pi OS on SD card
About 20 minutes
Flash the operating system and boot the Pi.
- On another computer, download Raspberry Pi Imager from raspberrypi.com/software.
- Insert the microSD card into your computer.
- Use Imager to write Raspberry Pi OS (64-bit recommended) to the SD card.
- In Imager's settings (gear icon), enable SSH, set hostname, username, password, and Wi-Fi if needed.
- Write the image, then eject the SD card and insert it into your Raspberry Pi.
- Connect power to the Pi (and ensure the SATA HAT is also powered—some HATs need separate power input).
You should see
The Raspberry Pi boots and you can see the desktop or connect via SSH. Drives may appear as icons if auto-mounted.
It didn't work
Pi won't boot or shows only a rainbow screen.
Re-flash the SD card. Check power supply is 5V 5A. Ensure the SD card is fully inserted.
Can't SSH into the Pi.
Verify SSH was enabled in Imager settings. Check the Pi is on the same network. Find its IP with 'ping raspberrypi.local' or check your router's device list.
Enable PCIe for SATA HAT
About 10 minutes
Configure the Pi to communicate with the SATA HAT via PCIe.
- SSH into your Raspberry Pi or open Terminal on the desktop.
- Edit the boot config file to enable PCIe.
- Add the line 'dtparam=pciex1' at the end of the file, save, and exit.
- Reboot the Pi.
sudo nano /boot/firmware/config.txtAfter editing, press Ctrl+O to save, Enter, then Ctrl+X to exit. Reboot with 'sudo reboot'.
You should see
After reboot, run 'lsblk' to see your SATA drives listed (e.g., /dev/sda, /dev/sdb).
It didn't work
Drives don't appear in lsblk after reboot.
Check SATA cables are fully seated. Some HATs require 'dtparam=pciex1_gen=3' for Gen 3 speeds—try adding that instead.
Run a speed test on your drive
About 10 minutes
Verify drive performance and PCIe link speed.
- Run a write speed test to confirm the drive is working and see transfer rates.
- Mechanical HDDs typically show 100–150 MB/s. SSDs should reach 300–500+ MB/s.
- For even better speeds, enable PCIe Gen 3 by adding 'dtparam=pciex1_gen=3' to config.txt and rebooting.
sudo dd if=/dev/zero of=/dev/sda bs=32M status=progress count=100 oflag=directReplace /dev/sda with your actual drive. This writes test data; don't run on a drive with existing data you want to keep.
You should see
The command completes and shows write speed in MB/s. You have a baseline for expected NAS performance.
It didn't work
Speed is much lower than expected.
Check you enabled PCIe (previous step). Try Gen 3 mode. Ensure the drive itself isn't faulty or in power-saving mode.
Install OpenMediaVault for NAS management
About 30 minutes
Set up a web-based NAS management system.
- OpenMediaVault (OMV) is a free NAS solution that runs on Raspberry Pi and provides an easy web interface for managing shares, users, and storage.
- Run the official OMV install script. This takes 10–20 minutes.
- After installation completes, reboot the Pi.
- Access the OMV web interface by navigating to http://<your-pi-ip>/ in a browser.
- Default login is admin / admin. Change this immediately after first login.
wget -O - https://github.com/OpenMediaVault-Plugin-Developers/installScript/raw/master/install | sudo bashAfter install finishes, reboot with 'sudo reboot'. Then access OMV web UI in a browser.
You should see
The OMV web interface loads at http://<pi-ip>/. You can log in and see the dashboard.
It didn't work
Install script fails or times out.
Check internet connection. Run 'sudo apt update && sudo apt upgrade' first. Try the install script again.
Can't reach the web interface after reboot.
Wait a few more minutes—OMV takes time to initialize. Verify the Pi's IP hasn't changed. Try http://<hostname>.local instead.
Alternative: Configure Samba via command line
About 20 minutes
Set up file sharing manually without OMV (optional advanced method).
- If you prefer not to use OMV, you can install and configure Samba directly.
- The detailed Samba setup code (updating, installing Samba, editing smb.conf, creating Samba users, setting permissions, and restarting services) is documented in the Home Server Code reference.
- Visit /resources/downloads/home-server-code for complete command-line instructions.
You should see
Samba is installed and configured. You can access shares from other devices on your network.
It didn't work
Samba configuration seems complex.
Use OpenMediaVault (previous step) instead—it provides a user-friendly web interface for all Samba settings.
Test your NAS with real-world file transfers
About 15 minutes
Verify performance and reliability by moving large files.
- Copy a large file (e.g., a movie or disk image) to the network share.
- Monitor transfer speed—should match or exceed your network link speed (1Gbps or 2.5Gbps).
- Try accessing the share from multiple devices simultaneously.
- Ensure drives stay cool and the fan spins appropriately.
You should see
Large files transfer smoothly. Multiple devices can access shares without issues. System remains stable under load.
It didn't work
Transfers are slow or stall.
Check Ethernet connection quality. Try a different cable. Verify PCIe Gen 3 is enabled for maximum drive speed.
System becomes unresponsive during heavy transfers.
Check power supply can handle the load. Monitor CPU temperature—add active cooling if overheating. Reduce simultaneous connections.
Design a custom 3D-printed case (optional)
About 180 minutes
Give your NAS a polished, finished look with a custom enclosure.
- Measure your assembled NAS (Pi + HAT + drives + top board).
- Use CAD software like Fusion 360 or TinkerCAD to design a case with ventilation holes for airflow.
- Export the design as .STL and send to a 3D printing service or print it yourself.
- Once printed, assemble the NAS inside the case.
You should see
Your NAS is housed in a custom case, protecting components and looking professional.
What to do next
- Samba setup codeManual Samba configuration reference
- OpenMediaVault docsLearn more about OMV features
- Pi forumsGet help with NAS projects
Stuck? Contact Vilros Support with your board model and what you see on screen.